This page contains some examples of how to use the Plumerai People Detection library to perform simple tasks. If you are looking for a minimal example, please also check out the examples under the API pages:
All the examples on this page use OpenCV as a camera input source, however that is just a choice: the library can work with any video input source. Since OpenCV has both a C++ and a Python API, we show examples for both on this page. However, we do not show an example of the Plumerai People Detection C API, since OpenCV has no proper C API anymore since version 2.4. If you wish to see more examples of our C API, please contact Plumerai.
To be able to compile and run the examples on this page, please install OpenCV first:
Since all examples below share the same camera initialization code, that part can be stored in a common header file init_camera.h (C++) or init_camera.py (Python):
#pragma once#include"opencv2/core.hpp"#include"opencv2/videoio.hpp"cv::VideoCaptureinit_camera(intheight,intwidth){constexprautocamera_capture_api=cv::CAP_V4L;// (1)autocapture_format=cv::VideoWriter::fourcc('M','J','P','G');// (2)constexprintcamera_id=0;// (3)cv::VideoCapturecamera(camera_id,camera_capture_api);camera.set(cv::CAP_PROP_FRAME_HEIGHT,height);camera.set(cv::CAP_PROP_FRAME_WIDTH,width);camera.set(cv::CAP_PROP_FOURCC,capture_format);if(!camera.isOpened()){throwstd::runtime_error("Unable to open video source");}returncamera;}
This line sets the capture API to Video4Linux. Change this as needed for your system. See the OpenCV website for a list of all options.
This line sets the camera format to Motion-JPEG. If your camera does not support this, then it could be changed to another format.
Here the camera to use is selected. In case of multiple cameras, 0 is the first camera, 1 is the second, etc.
importcv2ascvdefinit_camera(height:int,width:int)->cv.VideoCapture:camera_capture_api=cv.CAP_V4L# (1)capture_format=cv.VideoWriter.fourcc("M","J","P","G")# (2)camera_id=0# (3)camera=cv.VideoCapture(camera_id,camera_capture_api)camera.set(cv.CAP_PROP_FRAME_HEIGHT,height)camera.set(cv.CAP_PROP_FRAME_WIDTH,width)camera.set(cv.CAP_PROP_FOURCC,capture_format)ifcameraisNoneornotcamera.isOpened():raiseRuntimeError("Unable to open video source")returncamera
This line sets the capture API to Video4Linux. Change this as needed for your system. See the OpenCV website for a list of all options.
This line sets the camera format to Motion-JPEG. If your camera does not support this, then it could be changed to another format.
Here the camera to use is selected. In case of multiple cameras, 0 is the first camera, 1 is the second, etc.
Running one of the examples below is as simple as copy-pasting the code into a file example.cpp (C++) or example.py (Python) in the same folder as the above init_camera.{h,py} and followed by:
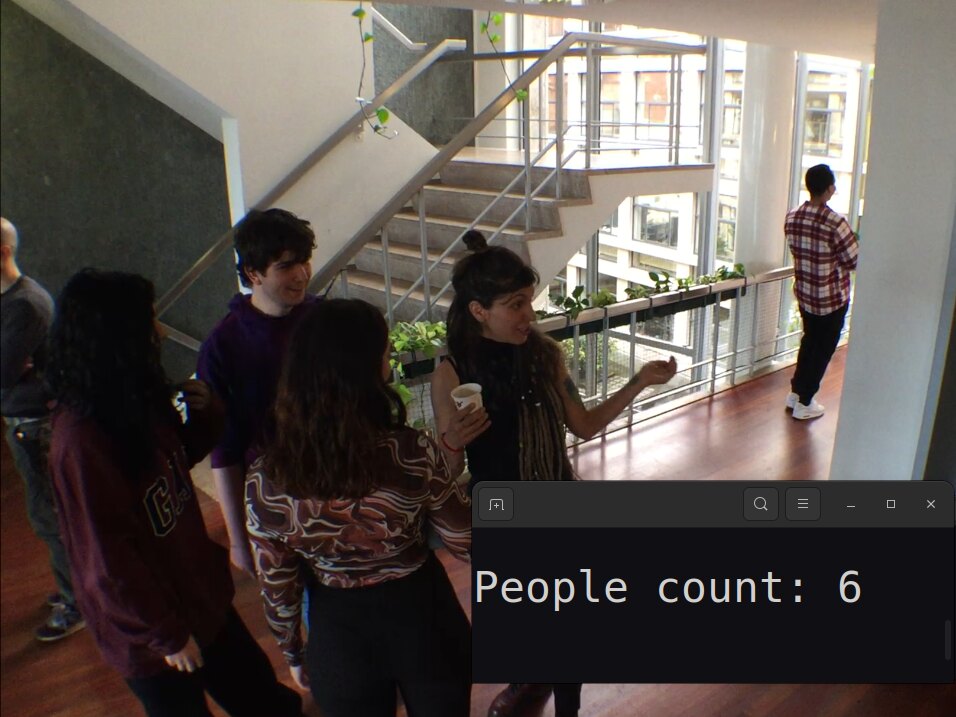
People counting using the Plumerai People Detection library is as simple as storing the highest found person ID value. This works since the library assigns the ID 1 to the first person it detects, ID 2 to the second, and so on.
Example of the people counting application.
Below is a simple people counting example that prints out the number of unique people it has encountered so far everytime this value changes.
The highlighted lines indicate the use of the Plumerai People Detection API.
#include<algorithm>#include<iostream>#include"init_camera.h"#include"plumerai/people_detection.h"intmain(){constexprintheight=720;// example camera image height in pixelsconstexprintwidth=1280;// example camera image width in pixelscv::VideoCapturecamera=init_camera(height,width);autoppd=plumerai::PeopleDetection(height,width);std::cout<<"Starting to count people"<<std::endl;size_tnum_unique_people=0;size_thighest_id_found=0;cv::Matcamera_image;while(true){constautocamera_read_success=camera.read(camera_image);if(!camera_read_success){throwstd::runtime_error("Could not read frame from camera");}autopredictions=ppd.process_frame(camera_image.data);std::sort(predictions.begin(),predictions.end(),[](BoxPrediction&a,BoxPrediction&b)->bool{returna.id<b.id;});// (1)for(auto&p:predictions){// (2)if(p.confidence<0.7f)continue;// (3)if(p.class_id!=CLASS_PERSON)continue;if(p.id>highest_id_found){// (4)num_unique_people++;highest_id_found=p.id;std::cout<<"People count: "<<num_unique_people<<std::endl;}}}}
If multiple people are found, we sort them by ID to make the people counting logic below work.
Here we loop over all the predictions returned by process_frame. If no people are detected, then this loop will not execute.
Here we filter out low-confidence predictions. The threshold (between 0 and 1) can be adjusted as needed. Note that the model comes with a built-in threshold (e.g. 0.6): boxes with confidences lower than that value won't show up here at all.
Here p.id is the tracker ID returned by the Plumerai People Detection library. We can use that to count the number of people detected so far.
frominit_cameraimportinit_cameraimportplumerai_people_detectionasppd_apiheight=720# example camera image height in pixelswidth=1280# example camera image width in pixelscamera=init_camera(height,width)ppd=ppd_api.PeopleDetection(height,width)print("Starting to count people")num_unique_people,highest_id_found=0,0whileTrue:camera_read_success,camera_image=camera.read()ifnotcamera_read_success:raiseRuntimeError("Could not read frame from camera")predictions=ppd.process_frame(camera_image.data)forpinsorted(predictions,key=lambdax:x.id):# (1)ifp.confidence<0.7:# (2)continueifp.class_id!=ppd_api.DetectionClass.CLASS_PERSON:continueifp.id>highest_id_found:# (3)num_unique_people+=1highest_id_found=p.idprint(f"People count: {num_unique_people}")
Here we loop over all the predictions returned by process_frame. If no people are detected, then this loop will not execute. If multiple people are found, we sort them by ID to make the people counting logic below work.
Here we filter out low-confidence predictions. The threshold (between 0 and 1) can be adjusted as needed. Note that the model comes with a built-in threshold (e.g. 0.6): boxes with confidences lower than that value won't show up here at all.
Here p.id is the tracker ID returned by the Plumerai People Detection library. We can use that to count the number of people detected so far.
#include<algorithm>#include"init_camera.h"#include"opencv2/highgui/highgui.hpp"#include"plumerai/people_detection.h"intmain(){constexprintheight=720;// example camera image height in pixelsconstexprintwidth=1280;// example camera image width in pixelscv::VideoCapturecamera=init_camera(height,width);autoppd=plumerai::PeopleDetection(height,width);cv::Matcamera_image;while(true){constautocamera_read_success=camera.read(camera_image);if(!camera_read_success){throwstd::runtime_error("Could not read frame from camera");}constautopredictions=ppd.process_frame(camera_image.data);for(auto&p:predictions){// (1)if(p.confidence<0.7f)continue;// (2)if(p.class_id!=CLASS_PERSON)continue;// Transform relative coordinates into pixel coordinates (3)intx_min=std::max(0,std::min((int)(p.x_min*width),width-1));inty_min=std::max(0,std::min((int)(p.y_min*height),height-1));intx_max=std::max(0,std::min((int)(p.x_max*width),width-1));inty_max=std::max(0,std::min((int)(p.y_max*height),height-1));// Pixelate the boxes to preserve privacyconstexprautopixelate_size=24;for(inty=y_min;y<y_max;y+=pixelate_size){for(intx=x_min;x<x_max;x+=pixelate_size){constautoy_ref=std::min(y+pixelate_size/2,height-1);constautox_ref=std::min(x+pixelate_size/2,width-1);for(intc=0;c<3;++c){autovalue=camera_image.data[(y_ref*width+x_ref)*3+c];for(inty2=y;y2<y+pixelate_size&&y2<y_max;y2++){for(intx2=x;x2<x+pixelate_size&&x2<x_max;x2++){camera_image.data[(y2*width+x2)*3+c]=value;}}}}}}// Display the results on screencv::imshow("Plumerai demo",camera_image);cv::waitKey(30);// in ms; can be changed to force a certain framerateif(cv::getWindowProperty("Plumerai demo",0)==-1){return0;// Exit when the X button is clicked}}}
Here we loop over all the predictions returned by process_frame. If no people are detected, then this loop will not execute.
Here we filter out low-confidence predictions. The threshold (between 0 and 1) can be adjusted as needed. Note that the model comes with a built-in threshold (e.g. 0.6): boxes with confidences lower than that value won't show up here at all.
The coordinates returned by process_frame are in floating-point between 0 and 1. In these four lines they are transformed to integer pixel coordinates to lie in the range of (0, width - 1) and (0, height - 1).
The size of the pixels used for the privacy mask can be changed here: the larger, the less recognizable people are.
In these two lines we compute the center reference coordinates of the large pixel, see the description of the intRoundTo function above.
importcv2ascvimportnumpyasnpfrominit_cameraimportinit_cameraimportplumerai_people_detectionasppd_apiheight=720# example camera image height in pixelswidth=1280# example camera image width in pixelscamera=init_camera(height,width)ppd=ppd_api.PeopleDetection(height,width)whileTrue:camera_read_success,camera_image=camera.read()ifnotcamera_read_success:raiseRuntimeError("Could not read frame from camera")camera_data=np.asarray(camera_image.data)predictions=ppd.process_frame(camera_data)forpinpredictions:ifp.confidence<0.7:continueifp.class_id!=ppd_api.DetectionClass.CLASS_PERSON:continue# Transform relative coordinates into pixel coordinatesx_min=max(0,min(int(p.x_min*width),width-1))y_min=max(0,min(int(p.y_min*height),height-1))x_max=max(0,min(int(p.x_max*width),width-1))y_max=max(0,min(int(p.y_max*height),height-1))# Pixelate the boxes to preserve privacypixelate_size=24foryinrange(y_min,y_max,pixelate_size):forxinrange(x_min,x_max,pixelate_size):y_ref=min(y+pixelate_size//2,height-1)x_ref=min(x+pixelate_size//2,width-1)rgb_value=camera_data[y_ref,x_ref,:]y2=min(y+pixelate_size,y_max)x2=min(x+pixelate_size,x_max)camera_data[y:y2,x:x2,:]=rgb_value# Display the results on screencv.imshow("Plumerai demo",camera_data)cv.waitKey(30)# in ms; can be changed to force a certain framerateifcv.getWindowProperty("Plumerai demo",cv.WND_PROP_VISIBLE)<=0:break# Exit when the X button is clicked
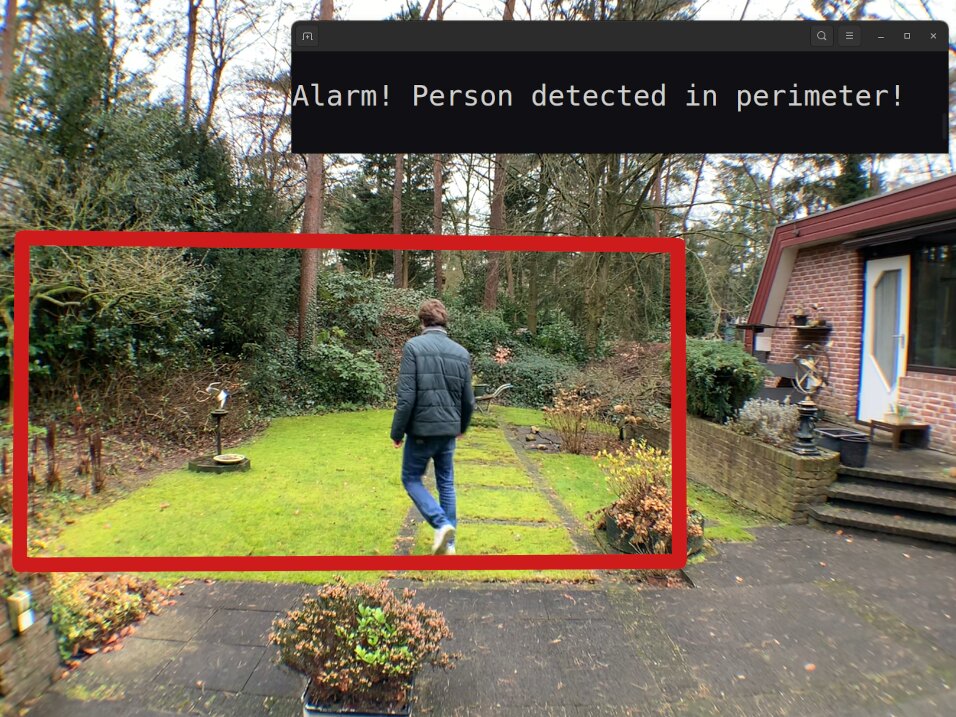
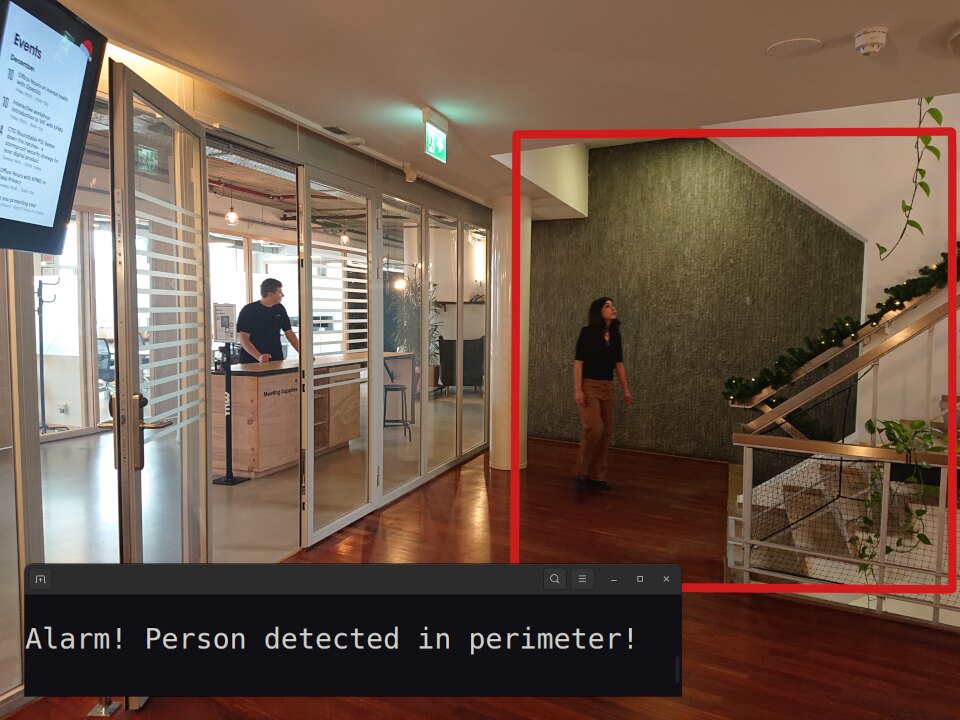
The Plumerai People Detection library can also be easily used to detect if people enter a certain perimeter / area-of-interest, e.g. a front lawn or a forbidden security area.
Example of the perimeter detection application: a restricted garden (left) and a restricted staircase (right).
Below is a simple perimeter detection example that sets a perimeter to the lower left quadrant of the screen, and then triggers an alarm by printing a message to screen if a person entered the area. In the example we assume that 'entering an area' is defined as the central lower point of a bounding-box, i.e. where a person's feet are if they are standing up-right. However, this logic can be adjusted of course to match your application.
The highlighted lines indicate the use of the Plumerai People Detection API.
#include<iostream>#include"init_camera.h"#include"plumerai/people_detection.h"intmain(){constexprintheight=720;// example camera image height in pixelsconstexprintwidth=1280;// example camera image width in pixelscv::VideoCapturecamera=init_camera(height,width);autoppd=plumerai::PeopleDetection(height,width);// Set an example perimeter / area of interest in relative coordinates (1)autoperimeter_x_min=0.0f;autoperimeter_x_max=0.5f;// left halfautoperimeter_y_min=0.5f;autoperimeter_y_max=1.0f;// bottom halfstd::cout<<"Starting the perimeter detection alarm, perimeter: ";std::cout<<"x: "<<perimeter_x_min<<" - "<<perimeter_x_max<<", ";std::cout<<"y: "<<perimeter_y_min<<" - "<<perimeter_y_max;std::cout<<std::endl;cv::Matcamera_image;while(true){constautocamera_read_success=camera.read(camera_image);if(!camera_read_success){throwstd::runtime_error("Could not read frame from camera");}constautopredictions=ppd.process_frame(camera_image.data);for(auto&p:predictions){if(p.confidence<0.7f)continue;if(p.class_id!=CLASS_PERSON)continue;// We take the person coordinates of roughly where the feet are (3)autoperson_x=p.x_min+(p.x_max-p.x_min)/2;// (4)autoperson_y=p.y_max;// (5)if((perimeter_x_min<person_x&&person_x<perimeter_x_max)and(perimeter_y_min<person_y&&person_y<perimeter_y_max)){std::cout<<"Alarm! Person detected in perimeter!"<<std::endl;}}}}
The coordinates are between 0 and 1 such that they are independent of the configured width and height, and can be easily matched with the boxes returned by the Plumerai People Detection API, which are also between 0 and 1.
Note that when using a webcam the view is mirrored so the left half on the screen means you actually need to go to the right to move inside the example perimeter.
This is a choice and should be changed depending on the exact use-case.
The middle point from the x/width dimension of the person box.
The bottom point from the y/height dimension of the person box.
frominit_cameraimportinit_cameraimportplumerai_people_detectionasppd_apiheight=720# example camera image height in pixelswidth=1280# example camera image width in pixelscamera=init_camera(height,width)ppd=ppd_api.PeopleDetection(height,width)# Set an example perimeter / area of interest in relative coordinates (1)perimeter_x_min,perimeter_x_max=0.0,0.5# left half (2)perimeter_y_min,perimeter_y_max=0.5,1.0# bottom halfprint("Starting the perimeter detection alarm, perimeter at:")print(f" x: {perimeter_x_min} - {perimeter_x_max}")print(f" y: {perimeter_y_min} - {perimeter_y_max}")whileTrue:camera_read_success,camera_image=camera.read()ifnotcamera_read_success:raiseRuntimeError("Could not read frame from camera")predictions=ppd.process_frame(camera_image.data)forpinpredictions:ifp.confidence<0.7:continueifp.class_id!=ppd_api.DetectionClass.CLASS_PERSON:continue# We take the person coordinates of roughly where the feet are (3)person_x=p.x_min+(p.x_max-p.x_min)/2# (4)person_y=p.y_max# (5)if((perimeter_x_min<person_x<perimeter_x_max)and(perimeter_y_min<person_y<perimeter_y_max)):print("Alarm! Person detected in perimeter!")
The coordinates are between 0 and 1 such that they are independent of the configured width and height, and can be easily matched with the boxes returned by the Plumerai People Detection API, which are also between 0 and 1.
Note that when using a webcam the view is mirrored so the left half on the screen means you actually need to go to the right to move inside the example perimeter.
This is a choice and should be changed depending on the exact use-case.
The middle point from the x/width dimension of the person box.
The bottom point from the y/height dimension of the person box.